Q. Why do I need a member card?
A. Your FRC Premium Club Member card is to identify you to our FRC Business Partners when they are providing a Discount or Offer
Q. Do you have plastic member cards?
A. No, at this stage, we have chosen not to use Plastic Membership cards for FRC members. Instead your membership card is a digital card which is built into the App. This allows us to get your card to you without having to mail it out.
It also has many other functions built into it, including the ability to place your own avatar on the card for identification purposes, and the ability to photograph your receipts to keep track of what you spend on the road. You can access your card by pressing the member card icon at the bottom of the screen on the App, or from within listings that offer a Club Discount.
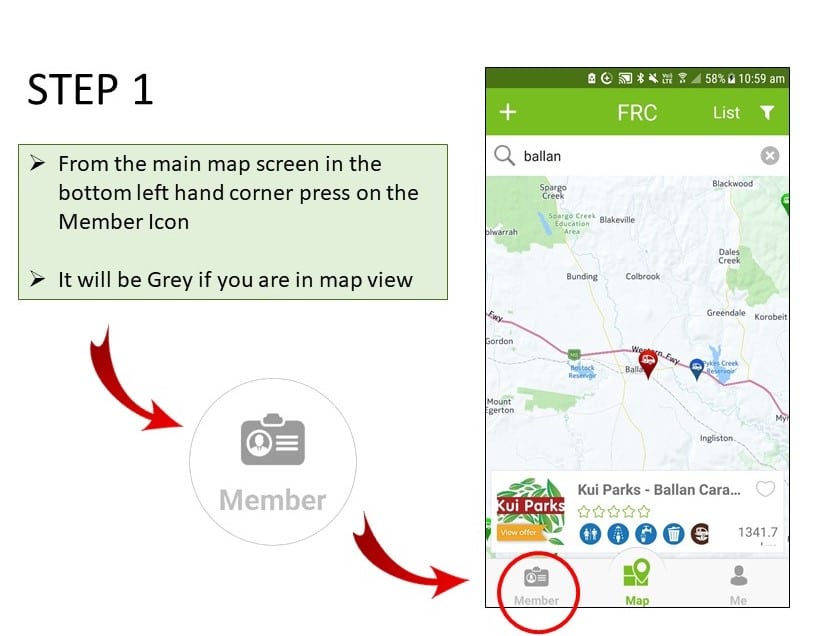
Q. Where can I find my member card?
To access your FRC Membership Card, follow the steps below.
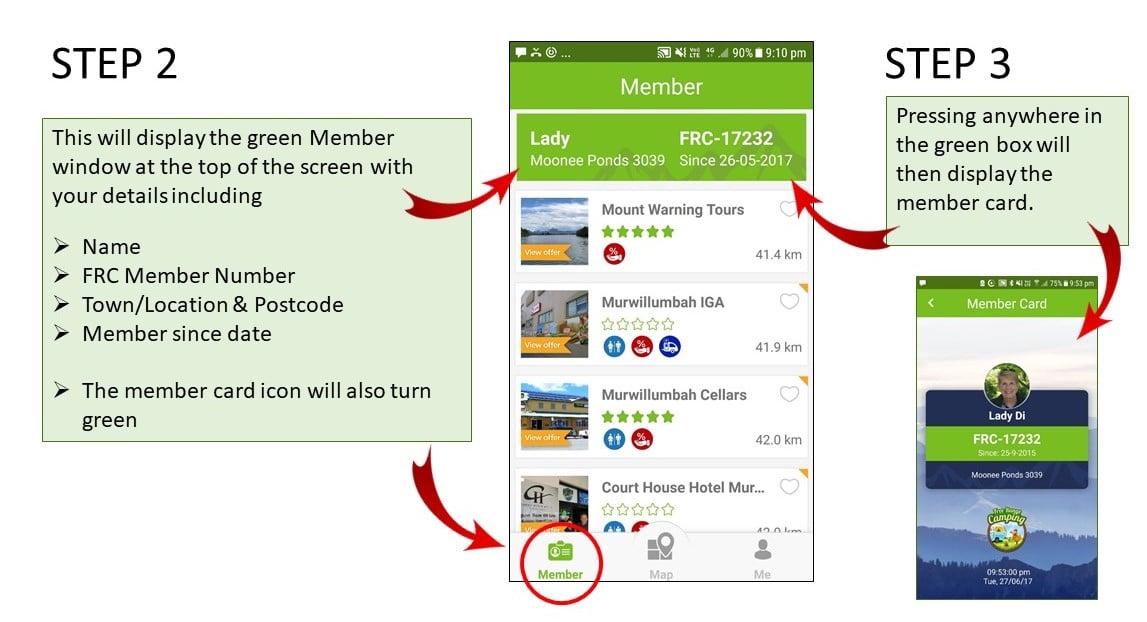
Q. What details are on my member card and why?
A. Your member card contains a variety of details;-

Photo Id – Your photo is used by our FRC Business Partners to visually identify you when you claim your Discount or Offer.
Name – Your name is shown to identify yourself to our FRC Business Partners when you claim your Discount or Offer.
Member Number – Your FRC Premium Club Member number is shown on the card and will be used by some FRC Business Partners to access your member details so they can confirm you are a current member.
Member Since – This shows the date that you joined FRC and ensures that your membership is still valid so that any discounts or offers can be honoured.
Location & Postcode – Your home town and postcode are shown on the member card to identify your home town location. As the Discounts and Offers are designed specifically for travellers, some FRC Business Partners may exclude certain postcodes from accessing the discounts in their local area. If this is the case, it will be included in the terms and conditions within the relevant listing.
Time & Date Stamp – At the bottom of the card you will see an active time and date stamp. This is to show our FRC Business Partners that this is a live and active member card. Static images will not be accepted.
Q. What member benefits are available to me?
As a FRC Premium Club Member there are a host of benefits available to you. These are outlined in further detail in the Premium Club Membership section. The benefits available to you at our FRC Business Partners will vary and can include either Discounts or Special Offers.
Discounts – Each participating Business partner will nominate their own Discounts. They will usually include a percentage discount off total or partial spends. In many cases items already on special will be excluded. Discounts are clearly displayed at the top of each listing and will vary from Business to Business.
Special Offer – Each participating Business partner will nominate their own Special Offer. They may include a two for one special, discount on second purchase, or a gift. Any terms or conditions of the offer are clearly displayed at the top of each listing or in the description and will vary from Business to Business.
Q. What is a FRC Business Partner?
A FRC Business Partner is any business, including Campgrounds or Caravan Parks that has partnered with FRC and provides an incentive or benefit to our Members in the form of either a Discount or Special Offer. Most of our Businesses are associated or affiliated with the RV & Camping industry.
Q. Do I have to put my photo on my member card?
Putting your photo on the member card is a choice that is left up to you, it is not compulsory, but highly recommended as some FRC Business Partners will only honour their Discounts or Offers if they are able to visually identify you. A photo on your card is the simplest way for them to do this.
Q. What does the View Offer Banner mean?
A. In the preview window when in either Map or List view, Campsites or Business listings that offer a discount/offer are clearly marked with an orange View Offer banner.

This is to readily identify those listings as FRC Business Partners so you know they have a member benefit available to you.
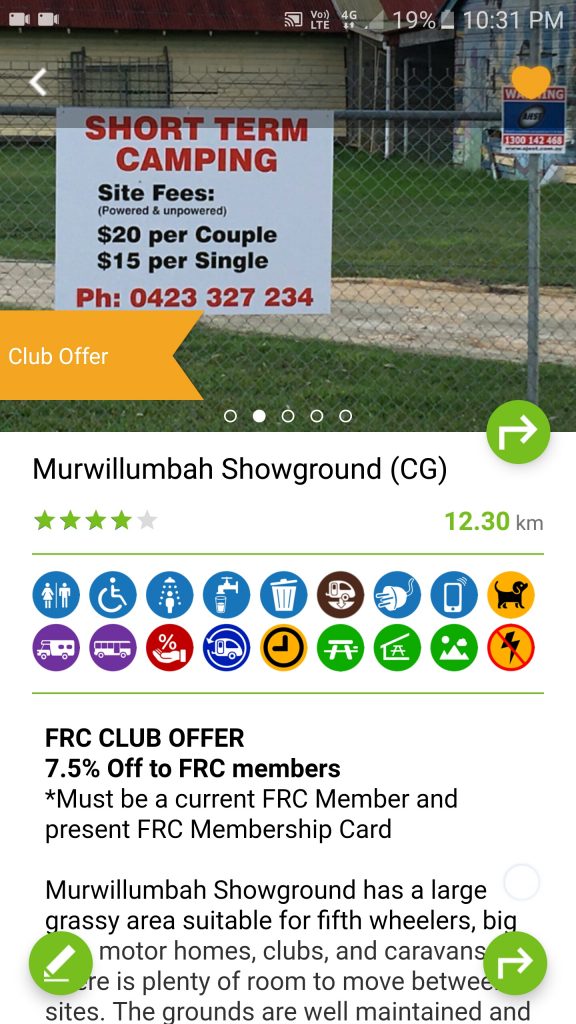
Q. What does the Club Offer Banner mean?
In each listing that offers a discount/offer, there will be an orange Club Offer banner across the top of the screen and over the images.

This is to readily identify that there is a discount or offer you are entitled to. The discount/offer will be displayed in the listing just under this the features/facility icons. It will be displayed in bold with any conditions under this.
Q. How do I claim my discount/offer?
To claim your discount/offer, simply have the relevant listing open on your App.
Show the staff member either your member card or the discount/offer from the listing.
They will then honour the discount/offer for you.
Remember to use the Photo icon and take a snap shot of your receipt for your records and also, to send a copy into us to go into the monthly draw for great prizes.
Q. How do I download the FRC App?
A. Downloading the App is simple.
From the FRC website www.fullrangecamping.com.au you can follow the links to either the Apple App store or Google Play store.
![]()
It is free to download the App in the usual manner, however you will need an active Premium Club Membership to login to use the App.
Or, you can head on over to either the Apple App store or Google Play store direct and search for FRC.
Q. How do I install the App?
A. Once you have downloaded the App, it is just a matter of pressing the install button and it will install directly onto your device. You will be asked two questions during the install.
Q1. Allow FRC to access photos, media and files on your device?
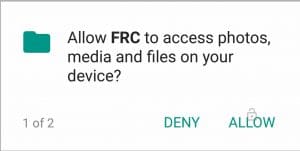
Allowing this access will permit FRC to store images and data files on your device, that are needed to display in the listings. It will also permit you to send images to FRC.
Q2. Allow FRC to access this device’s location?
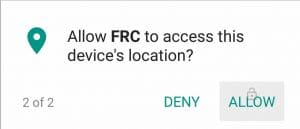
Allowing this access will enable us to automatically show sites in your area and assist with the navigation functions of the App. It will also show listings in your vicinity that offer discounts or special offers to members.
Q. How do I login to the App?
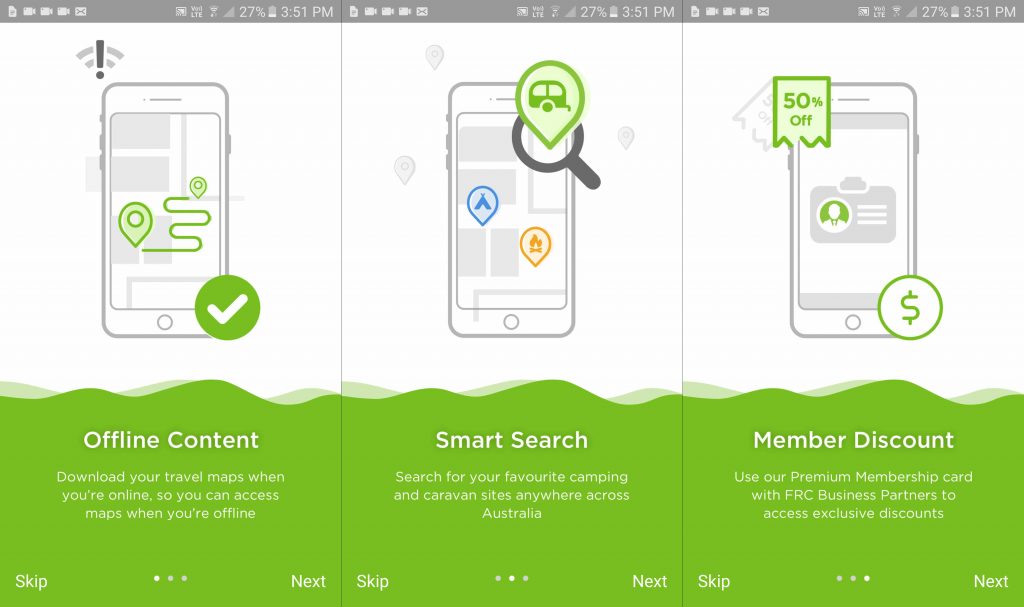
When you open the app for the first time, you will get a series of welcome screens.
You will then see the login screen. Enter the email address and password you registered with. Then press the green Sign in button.
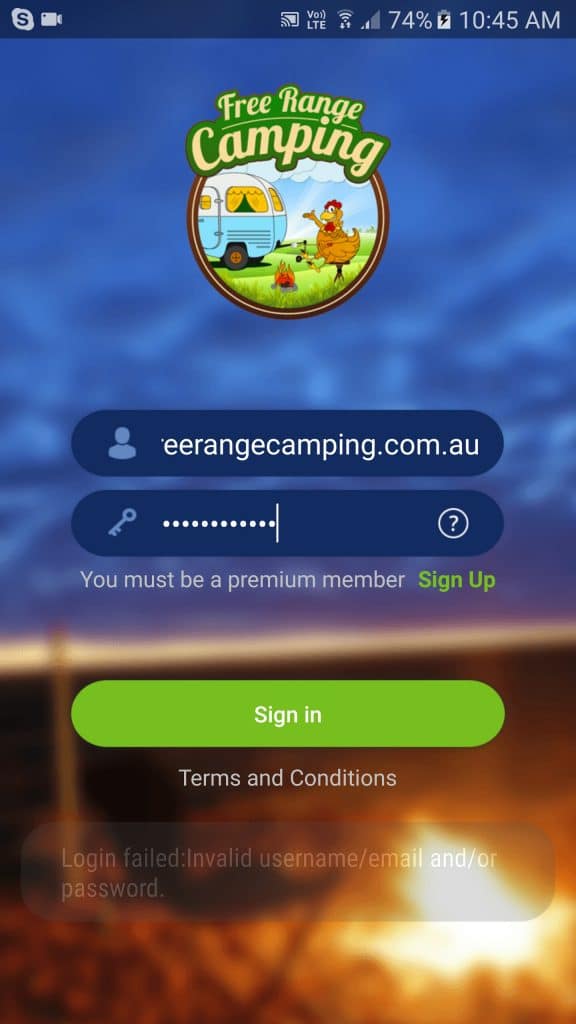
The App will check your credentials. If your password is incorrect, you will receive an error message. If correct you will receive a Welcome message and the map will open at your current location with all available sites in the nearby area.
Q. What do I do if I forget my password?
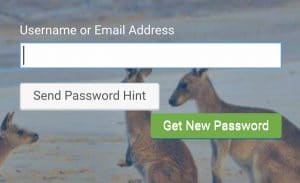
If you cannot remember your password, there is a small ‘Question Mark – ?’ in the password entry field.

Click on this and you will be directed to the reset password screen of the website. Here you can enter your username or email address. You can then either ask for a Send Password Hint or Get New Password.
Q. Do I have to log in each time I use the App?
This depends on how you exit the App after you finish using it. If you choose to log out of the App from the Me screen after using it, then Yes, you will have to log back in to the App on your next use. However, if you just exit the App by closing it, or it times out, your App will remember your credentials and log you back in automatically.
NOTE: If you are planning to use the App when offline, it is recommended that you do not log out. If you do log out and then try to log back in whilst you have no Wi-Fi or mobile data connection, you will be unable to access the App as it cannot verify your login details.
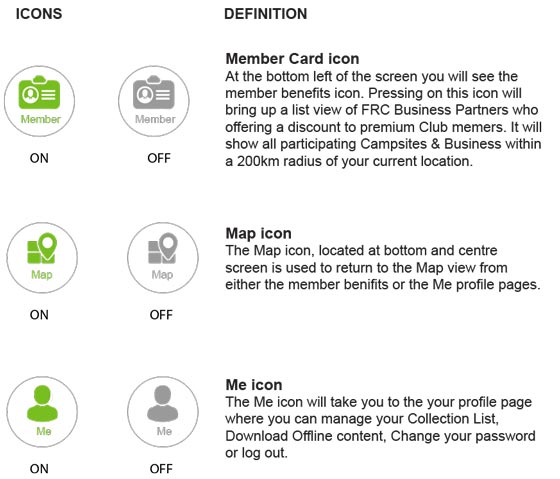
Q. How do I log out?
To log out of the App, press the Me icon located at the bottom right corner of your screen to access the Me page. Press “Log out” at the bottom of the page.
NOTE: This will log you out and you will need to log back in again with your valid username and password to access the App again. This is different to just closing the App.
Q. How can I change my password?
From the Me screen, select Change Password.
You will then be asked to enter your new password and confirm it.
You can also change your password from the Member Profile page in the Admin section via the website.
Q. How often do I have to update the App?
A. If updates are made to the App, we will advise you of this either via email or by notifications from your relevant App store, i.e. Google or Apple.
You can also check for updates yourself by activating notifications or visiting the store on a regular basis to check.
Q. How often are the campsites & business listings updated?
A. We are updating existing listings and adding new listings on a daily basis. As the changes are made they are updated on the App on an hourly basis.
Each time you open your App, it will automatically accept a small 2–3 mb file that will update your App and make any new or updated listings available for you to see.
Q. What do I do if my App crashes?
A. If your App crashes, you will get a message that reads.

If this occurs, try the following;-
Exit the App restart it
Reboot your device
Check and update latest software upgrades if available. This is done from the Setting Screen on your device.
If this still fails, you may need to uninstall and re-install the App.
If your App continues to crash please report it to us, including the device and the version number you are using, by emailing us direct from here.
Report App Crash
Q. How do I search for sites on the App?
A. There are several ways to search for Campsites or Businesses on the App.
When the App first opens, it will automatically open in the Map view and zoom into your current location.
From here, you can use one finger to move the map around your screen, or two fingers to zoom in and out of the Map.
Once you stop moving, the map will populate with map markers. By default all the sites we have available will appear, including Campsites & Businesses.
To reduce the amount of map markers showing, you will need to use our Filters to select only the sites you wish to see. For more information on Filters click here.
You can also search by the name of a Town or Location.
At the top of the Map screen you will see a magnifying glass with the words ‘Town or Location’.

Start typing in this section and a list of Towns or Locations matching your request will start to appear. When you find the Town or Location you would like to see, press on the map marker and you can zoom into this location on your screen.
NOTE: At this stage, you can only search by Town or Location names, not by specific site names.
Q. What happens when I press on a map marker?
A. When you press on a map marker, a small preview window will appear at the bottom of the screen, displaying the following information.
Image
A small preview image of the site if provided by the site owner, or if unavailable an image showing the category the site belongs to.
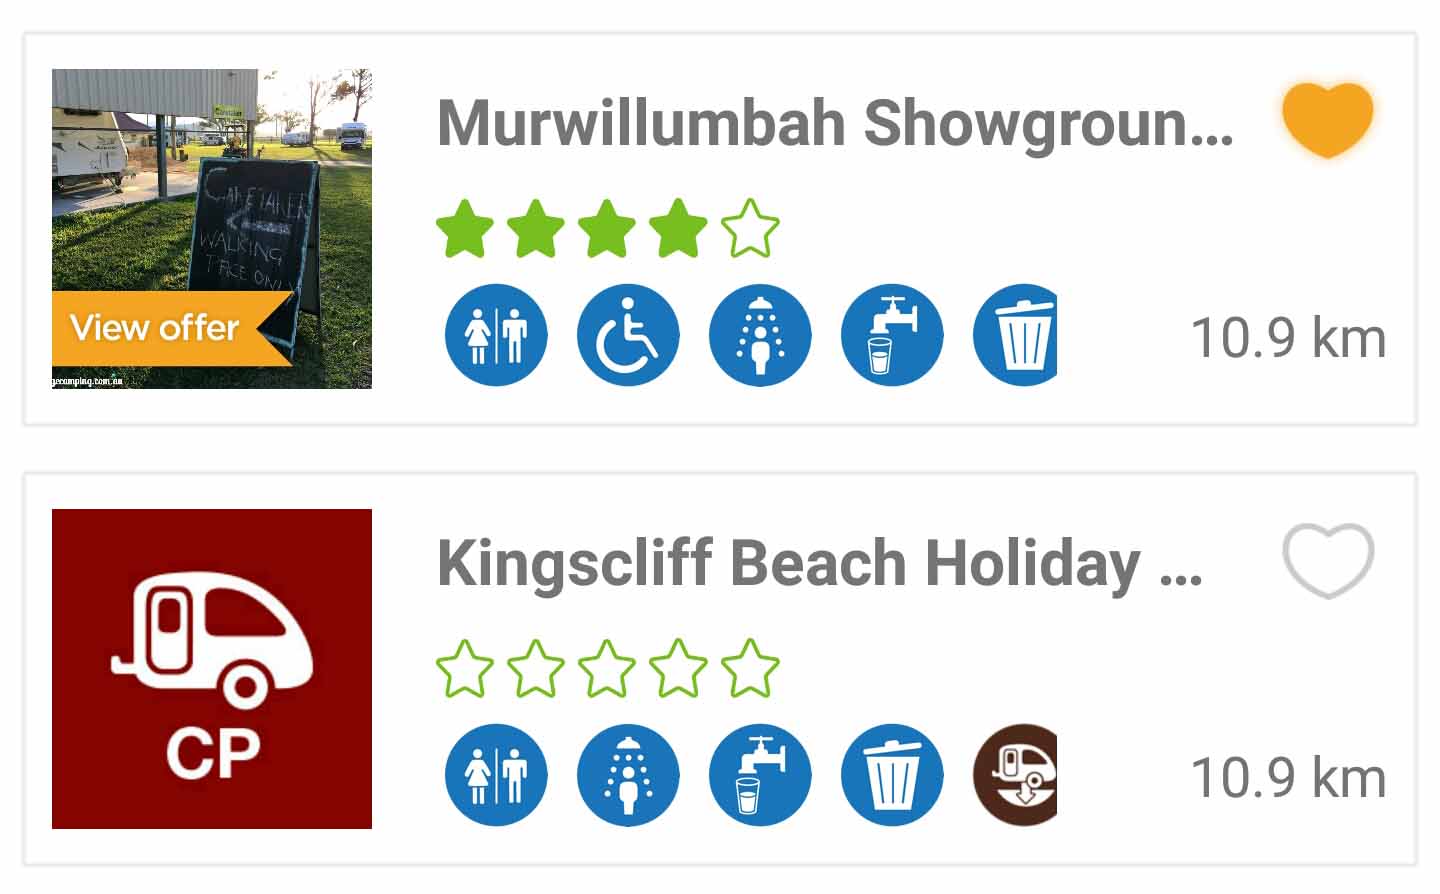
Title
The title of the site is shown. If the title is long, it may be truncated. To see the full title you will have to press on it and enter the full listing.
Heart Icon
![]()
Pressing this icon allows you to place this site into your Favourites Collection list. If the heart is clear it has not been selected yet, if it is orange, it has been previously selected.
Ratings

Under the title of each listing you will find a series of stars used to rate each site. These will vary from 1 star through to 5 stars. The more stars the better the rating.
Icons
![]()
The icon section shows all the features or facilities at a site or location. There are only a limited number of icons available in this view, however, if the last icon is truncated, it will mean that you can scroll across these icons to view them all. For a more detailed explanation of our icons as they refer to each listing, see the bottom section within the listing where you will see the icons again, but this time with a title and additional information if required.
Or for a full list of our icons refer to the Icons section here.
Distance
In the bottom right hand corner of the preview window, you will see a distance shown in Km. This is the distance from your current location to the site.
Q. How do I use the Filters on the App?
A. The FRC App has filters installed which allow you to search for only the sites that meet your selection criteria.
To use the filters, press on the ‘Filter’ Icon at the top right of the Map or List screen.
![]()
From here you will see two categories of Filters. ‘CAMPSITES’ & ‘BUSINESS’
Campsites
Under Campsites you can select only the type of sites that are relevant to you. For a full list of Campsite categories, see ICONS & MAP MARKERS EXPLAINED
Once you select the category you would like, it will change colour.
You can then further select the Features you would like at that site. Eg, Toilets, Showers, Pets etc.
Remember the more you select, the less map icons that will show.
You can also use this section to select specific types of Campgrounds.
E.g., if you wanted to show only Showgrounds, you would scroll down the list, and select the ‘Showgrounds’ icon. This will then only display Showgrounds all around Australia, depending on where you are located on the Map, or in List view they will appear in order of the distance from your current location.
Once you have made your selection, press the ‘SEE FILTERED SITES’ button at the bottom of the screen. This will take you back to the Map or List view and show only the sites that are relevant to your selection.
Business
Under Business, you can select the type of business that you are looking for. For a full list of Business categories see here.
Once you select the category you would like, it will change colour.
You can then further select the Features you would like at that business. E.g., Discount, Offer or RV Parking.
Once you have made your selection, press the ‘SEE ALL SITES’ button at the bottom of the screen. This will take you back to the Map or List view and show only the sites that are relevant to your selection.
Reset Filters
At the top left of the screen you will see the ‘Reset’ Button. Pressing this will reset all filters and allow the map to be re-populated with all available campsites and business listings.
Clear Filters
At the top right of the screen you will see the ‘Clear’ button. This will remove all selected categories or ticks from the Features boxes.
Q. How do I save my favourite sites?
A. You can save your favourite sites on the App in what we call a Collection. You can save to a Collection from either the website or the App.
From the App
Firstly you need to name your Collections list. To do this to go to your profile page on the App. Press the ‘Me’ icon at the bottom right of the screen.
There you will see the ‘My Collection’ page.
By default, you will see a collection called ‘Default List’. It will be empty until you add one of your favourite listings to it. You can either use this list, or create a new Collection list using your own title.
To do this-
Press on the Create New Collection icon.
Enter the title of what you would like to call it.
e.g. My Favourite Campsites & press Save or Done (Dependant upon your device).
You can now start saving your favourite Campsites or Businesses from either the Map or List views.
To save from the Map view, press the heart at the bottom right of the screen.
To save from the List view, you can touch the heart to the right of the preview box.
To save from within a listing, touch the Heart at the top right of the screen.
Once you touch the heart, it will turn orange, this will add the listing to your collections. The next time you go to the collections you will see a list of all your favourite saved campsites.
Q. What information can I find in each listing?
Images
If a listing has photos available these will be clearly displayed across the top of each listing. A site may contain up to 10 photographs. The images will auto scroll with 5 second intervals. You can speed up the process by moving through them yourself, or placing your finger on an image to pause it.
If photographs are not available it will mean we are in the process of still obtaining them from site owners or members. In this case a generic category icon will be shown.
Club Offer
Where a campsite or business is providing a member benefit, either discount or offer, it will be clearly displayed across the images at the top of the listing with a Club Offer Banner.
The actual offer being made will then be displayed under the features/facility icons. It will be displayed in Bold with any conditions under this.

Listing Title
Each listing will show the title of the site and in brackets the category it belongs to. See below for category abbreviations.
(RA) = Rest Areas
(FC) = Free Camps
(CG) = Camp Grounds
(CP) = Caravan Parks
(HS) = House Sitting
(HO) = Help Out
Ratings
Under the title of each listing you will find a series of stars used to rate each site. These will vary from 1 star through to 5 stars. The more stars the better the rating.
Distance
Also under the title of each listing you will see a distance shown in Km. This is the distance from your current location to the site.
Navigation Arrow
To the right of the title and at the bottom right corner of the screen, you will see a navigation icon.
![]()
By pressing on this icon you will be given the option to navigate to the site using either
Google Maps – if online
Apple Maps (iOS only) – if online
Google Maps & Here Maps if offline
For more information see our help section on NAVIGATION
Icons
This section shows all the features or facilities at a site or location. For a more detailed explanation of our icons as they refer to each listing, see the bottom section of the listing where you will see the icons again, but this time with a title and additional information if required.
Or for a full list of our Icons refer to the Icons section here.
Description
Each listing will open with a description of the campsite or business giving you an overview of what you can expect at the site.
How To Get There
The majority of listings will have written instructions on how to get to a site, usually from major locations. This will include where possible, any recognisable landmarks, designed to make it easy when approaching a site, especially with a large caravan or motorhome. They may also include short cuts and GPS warnings if appropriate.
Site Access
The majority of listings will have information provided about the site access. This will include what to look out for visually as you approach the entrance to the site and if provide further instructions on what do to once at the site. E.g. Check-in instructions
Video Preview
Where available, a listing may contain a short video presentation of the site, showing the main features of the site. This is still only available for a limited number of sites but our list is growing daily.
Listings that have a video will have a video play button clearly visible.

Fees & Bookings
In each listing where relevant, we aim to give an indication of fees if applicable to that site. We rely on the site owners to provide this information and it is indicative only. It should not be relied upon to be 100% accurate. We have supplied contact details of each site if available and would encourage you to check direct with site owner in regards to the latest fees.
Things to Do
Where possible, campsite listings will contain a section highlighting either things to do at the actual site, or in the nearby area. This allows you to pre-plan your trip by giving an indication of how long you may need to stay at a certain location.
Address & Contact Details
Each listing will have the full address of the site, allowing to you enter it into your GPS device if required, or ring the site owners direct.
Website Links
Where provided and if available each listing will have a direct link to the owner’s website or Facebook page where you can access further information about them.
Pricing
Where applicable, this will show the lowest base price available for a listing in its simplest form. E.g. From $5
Prices shown are based on a per couple per night basis. We rely on the site owners to provide this information and it is indicative only. It should not be relied upon to be 100% accurate.
Features
This is a list of all the features and facilities provided at the site location. They will be identical to the icons shown in both the preview window and also at the top of the site listing. However, in this section there will be a title showing what each icon means, and also where relevant, additional comments.
E.g. Time Limit Applies – 72 Hours

Update Site
This button allows you to provide information to us so we can update sites and verify site information.
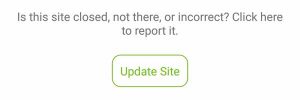
For further information about this function see Update Site
Map
In each listing you will see a small map. This map is not for navigation purposes but only to give a visual of the site location and nearby streets. By pinching with two fingers on the map you will be able to zoom in and out.
Rate this place
This section allows members to leave a review of each site. For full explanation please see How can I review a site?

Q. What is the camera icon in a listing used for?
At the bottom of each business listing you will find a Camera Icon.

This icon is used for you to photograph your receipts should you shop at a FRC Business Partner
By photographing your receipt it will do two things.
1. It will keep the image in your image library for your records. This will help in keeping track of costs for your trip as well as keeping a copy on hand should you need to return any purchases, or for warranty purposes.
2. It will automatically send a copy of the receipt to us with your member number attached. This will allow us to collate the data and prove to relevant authorities, councils etc., that campers, caravanners and travellers do spend money in locations as they travel. This will go a long way to providing future Free and Low Cost Camping options to all of us.
Once you have taken a snap shot of your receipt, make sure it is clear and be sure to press the OK button at the top left of your screen. This will save it to your device and send a copy to FRC.
Sending in your receipts will automatically enter you in our monthly draw to win some fantastic prizes.
It is not compulsory to send in your receipts, and all information sent in will be kept strictly confidential. For more information on this please refer to our Privacy Policies.
Q. What is the member card icon in a listing for?
At the bottom of your listing you may see a Member Card icon.

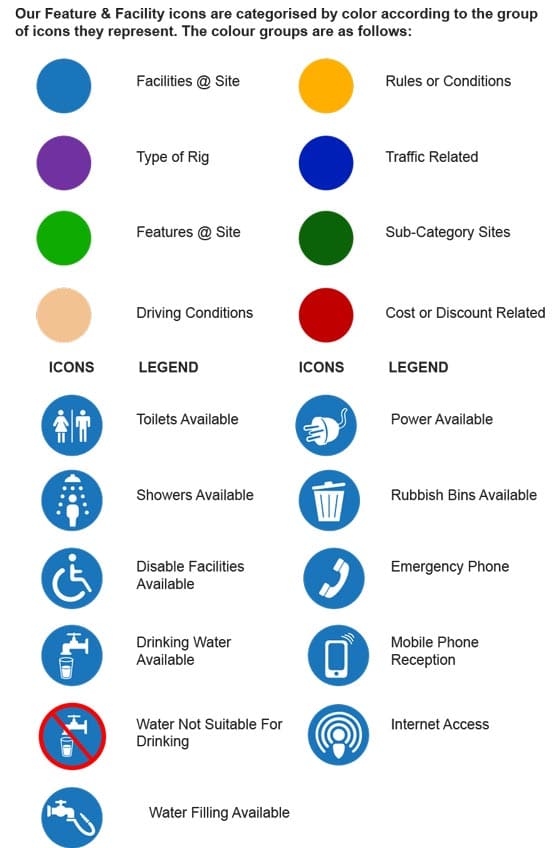
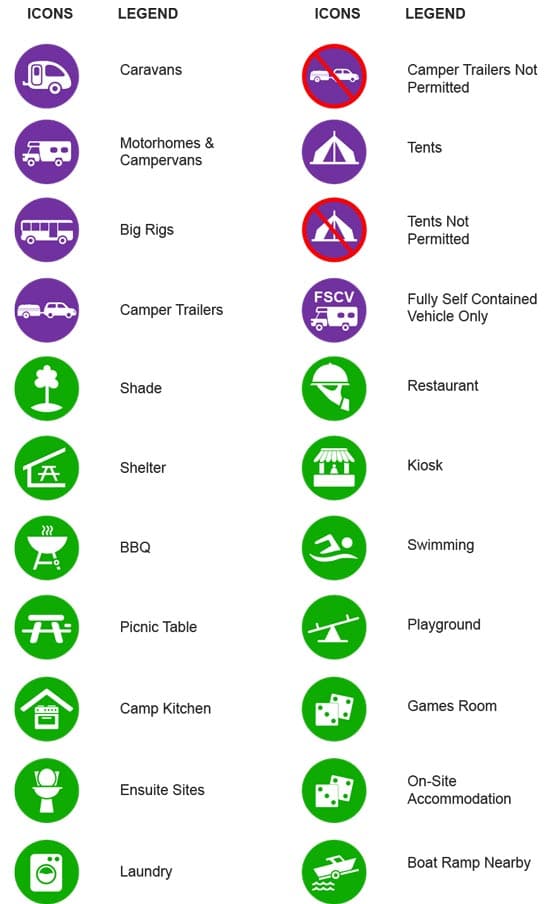
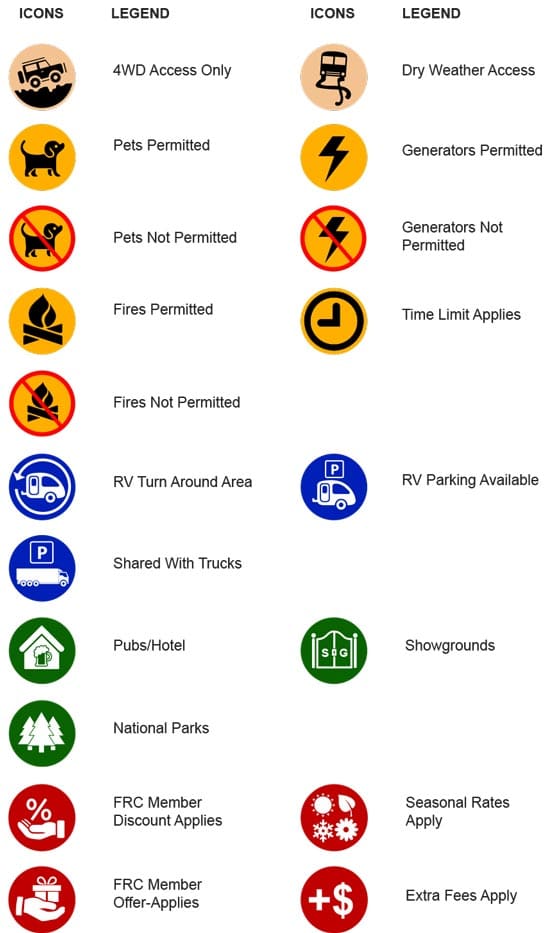
Camp Site Icons & Map Markers
Business Icons & Map Markers
Site Features/Facility Icons
Other Screen Icons
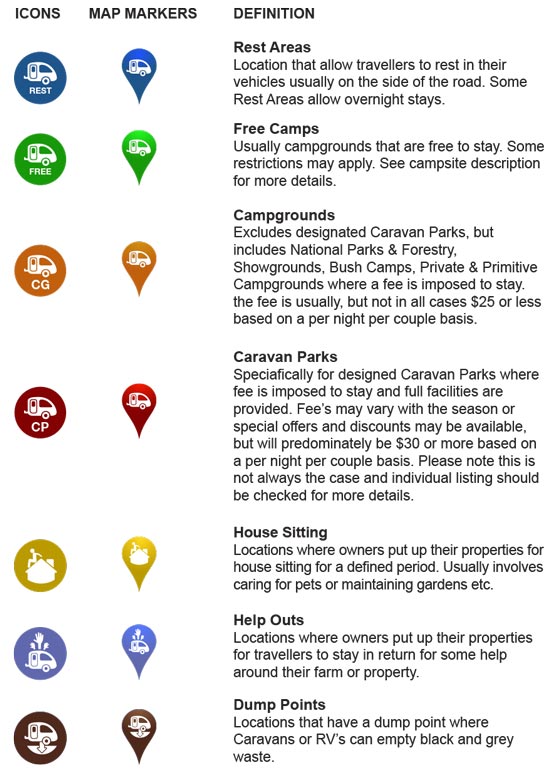
Camp Site Icons & Map Markers
![]()
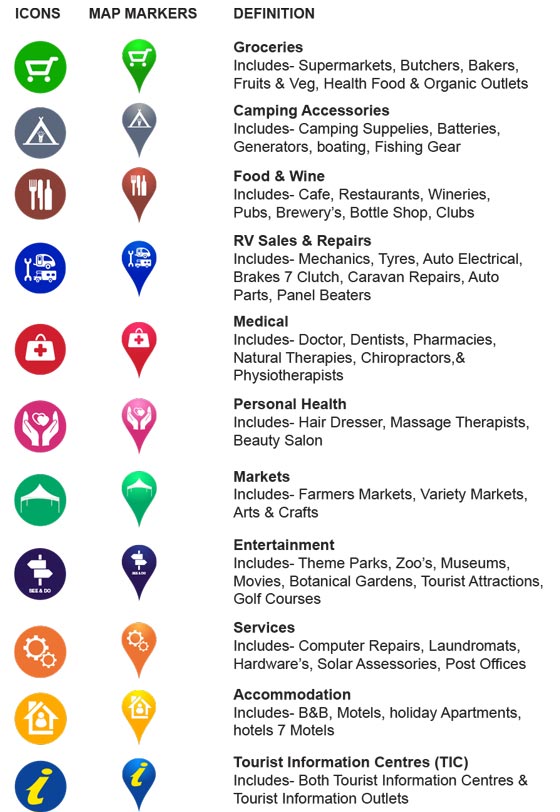
Business Icons & Map Markers
![]()
Site Features/Facilities
![]()
![]()
![]()
Other Screen Icons
![]()


Q. How do I navigate to a site? – Online Navigation
A. Our inbuilt navigation tool alleviates the need to input co-ordinates into a separate GPS device.
To the right of the title and at the bottom right corner of the screen in each listing, you will see a navigation icon.
![]()
By pressing on this icon you will be given the option to navigate to the site using either Google Maps or Apple Maps (only if using an iOS device)
NOTE: You can only use the Apple Maps if you will have full connectivity for the whole of your journey. If this is not the case, it would be advisable to use Google Maps and refer to our Offline navigation section.
Once you have chosen your preferred mapping option, you will get the following notifications;-
Android Devices
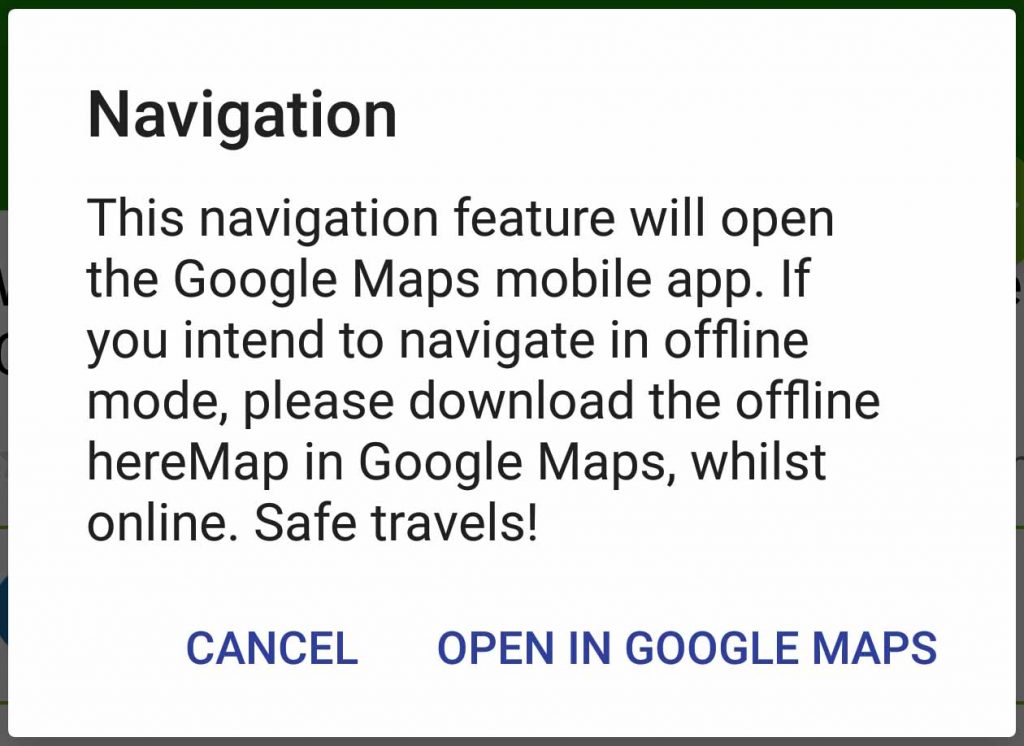
Select OPEN IN GOOGLE MAPS
You will then be directed to Google maps where you will be shown the following details;-
– Your starting location
– Your destination
– Approximate time to location depending on mode of transport
– A map showing the fastest and alternate routes if any
– Approximate time and distance to location
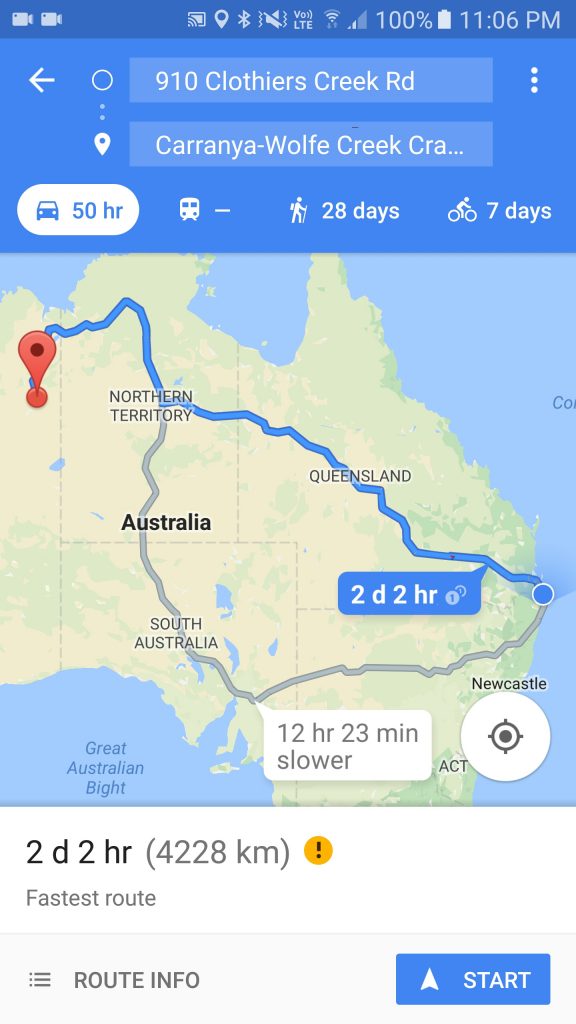
There are other route options available by pressing the ROUTE INFO button. When you are happy with the chosen route, simply press the START button at the bottom of the screen and Google Maps will direct you to your chosen site.
To return back to the listing from Google Maps, simply press the back button on your device.
iOS Devices
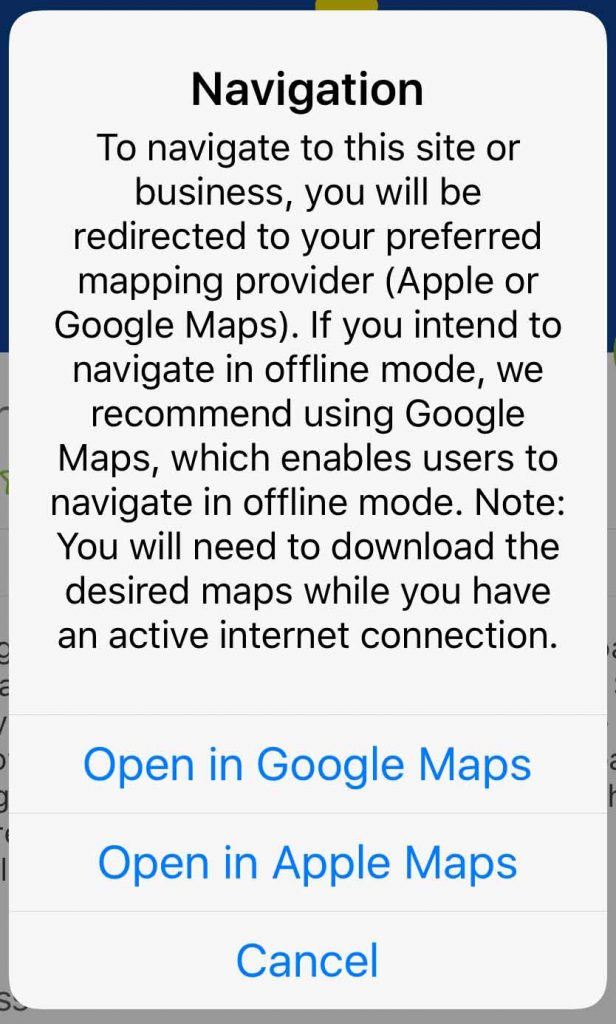
You will have the choice. If you Choose Google Maps, refer to instructions above.
If you choose Apple Maps you will see the following:-
Select Open in Apple Maps
You will then be directed to Apple Maps where you will be shown the following details;-
-Your Current Location
-Your Destination
-Approximate time to location depending on mode of transport
-A map showing the route
-Approximate time and distance to location
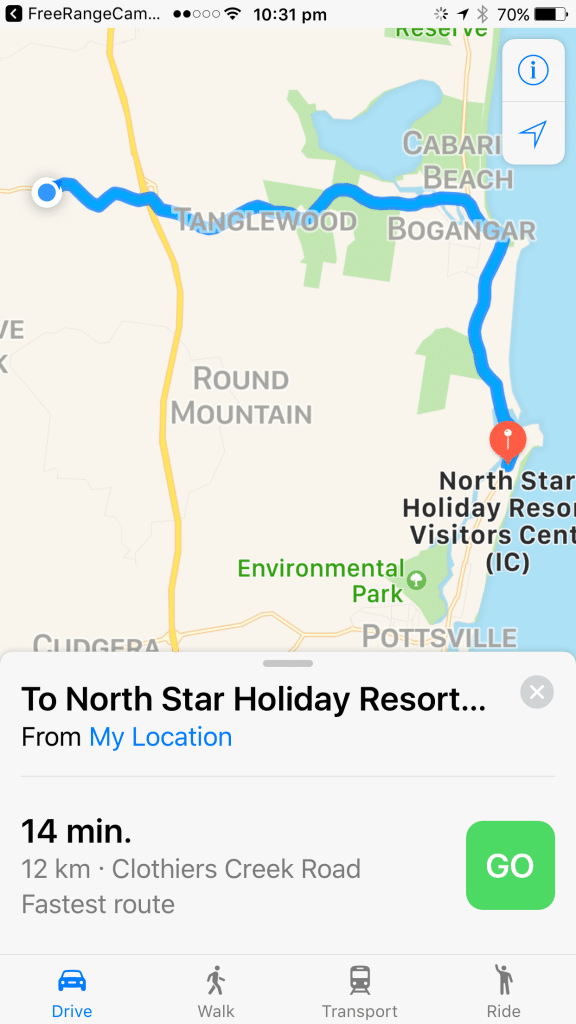
If you are happy with the chosen route, simply press the GO button at the bottom of the screen and Apple Maps will direct you to your chosen site.
To return back to the listing from Apple Maps, simply press the back button on your device.
Q. How do I navigate to a site? – Offline Navigation
If you wish to take advantage of our Offline navigation functions, you will firstly have to download Offline maps from Google Maps. This function will allow you to use the app to navigate to a campsite or business for times when you have no Wi-Fi or phone connection.
To download Offline Maps take the following steps:-
– Open Google Maps on your device
– Select the drop down (hamburger) menu in the top left of screen.
– Select Offline maps
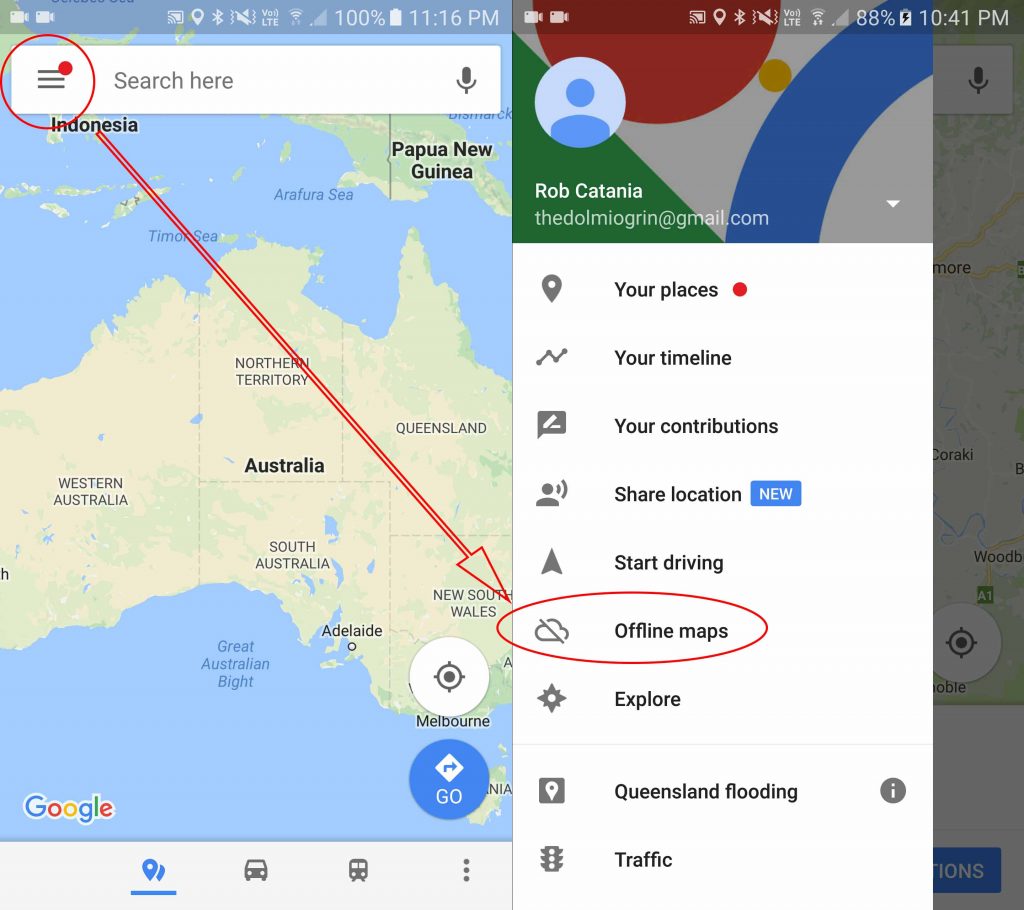
– Press on SELECT YOUR OWN MAP
– Use the selection window to select the area that you wish to download maps for. You can use two fingers to zoom in and out on the area that you require.
Select DOWNLOAD
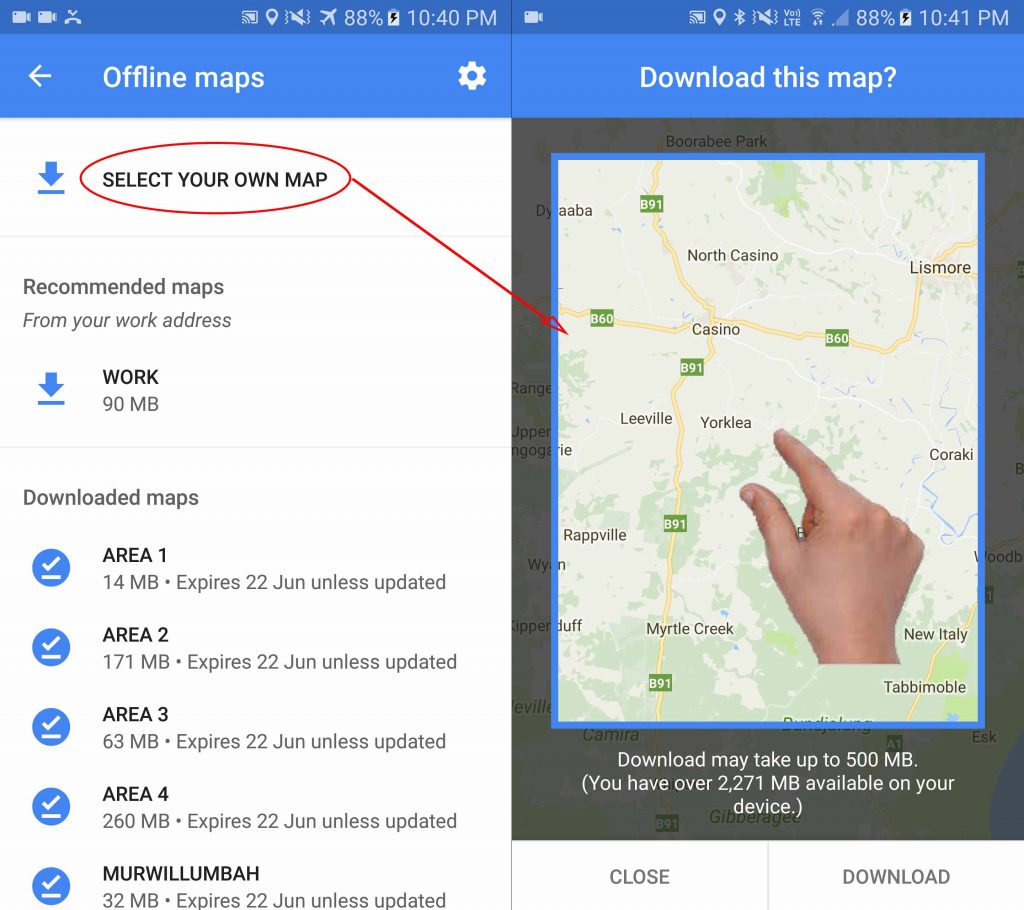
NOTE:
You will have to prepare for this before you go offline and still have Wi-Fi connectivity.
Offline maps will require data downloads and adequate storage space on your device.
The bigger the area, the more data you will require.
Offline maps will not work with Apple Maps.
You will need to download offline maps for all the areas you anticipate travelling to. If you select a site out of this area, offline navigation will not work.
By default, Google Offline Maps will only remain valid for 1 month from the date of downloading. After this they will automatically update to keep up-to-date.
Once you have installed all required offline maps to your device, you can navigate to your selected campsite or business using the same procedures as Online Navigation.
Q. How can I zoom back into my current location?
Towards the bottom right hand corner of the mapping screen, you will see a small blue button that looks like a small compass.

Pressing this icon, no matter where you are located on the map, will return you to your current location. Provided the location services have been activated on your phone.
Q. How are distances to a site calculated?
The distances shown on both Google Maps and Apple Maps are road distances by kilometres. The suggested route is shown in with a blue line.
Q. Can I use the App offline?
A. Yes. The FRC App is designed to be used offline for times where you have no Wi-Fi or phone connection. To do this you will have to prepare it by following the instructions in How do I download offline maps?
Q. Do I need to download offline maps?
A. You will only need to download offline maps in the event you are travelling to an area that has no internet activity, but you still want to be able to view and find campsites or businesses on the App. Downloading our offline maps will allow for our map markers and all sites to show on your screen without a connection. By pre-loading offline maps, you will be able to view all listings at all times.
This is different to our offline navigation feature. For more information on this refer to How do I navigate to a site – Offline Navigation
Bear in mind that any changes or updates made to any listings while you are in offline mode will not be actioned until you are back in a mobile coverage area or have a Wi-Fi connection.
Q. How do I download offline maps?
A. To download offline maps, you will need to do the following;-
Go to the Me page > Select Offline Content > Select Offline Maps
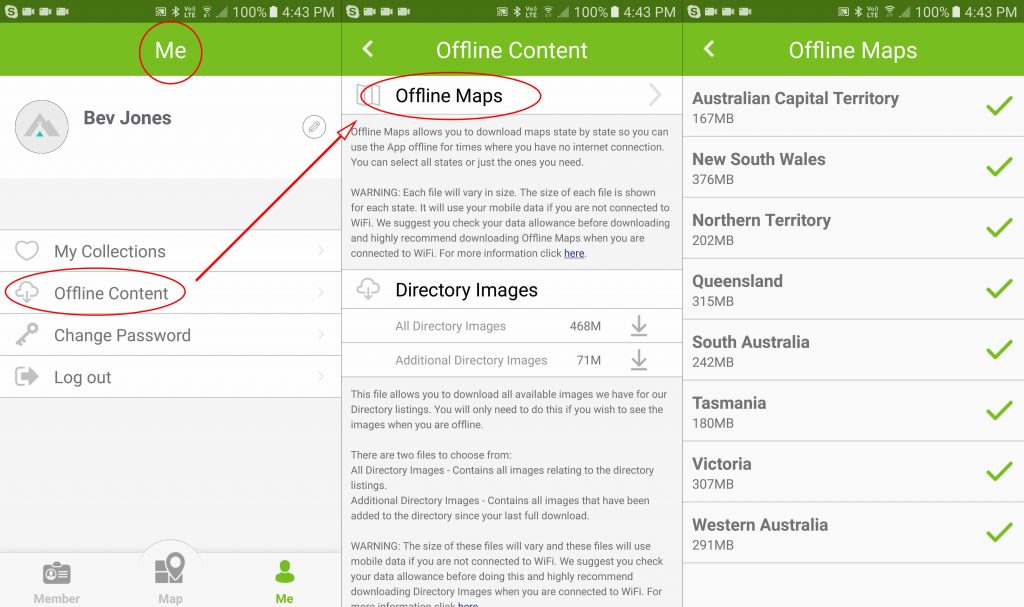
Offline maps will allow you to download maps state by state. You can select only the state that you require if you wish to save on data. The approximate size of each data file will be shown below each state. You can only download one state at a time. You will only need to do this only once.
Once you have done this you will be able to view all content when you have no connection.
For more information on the amount of data required, see How much data is used when I download things.
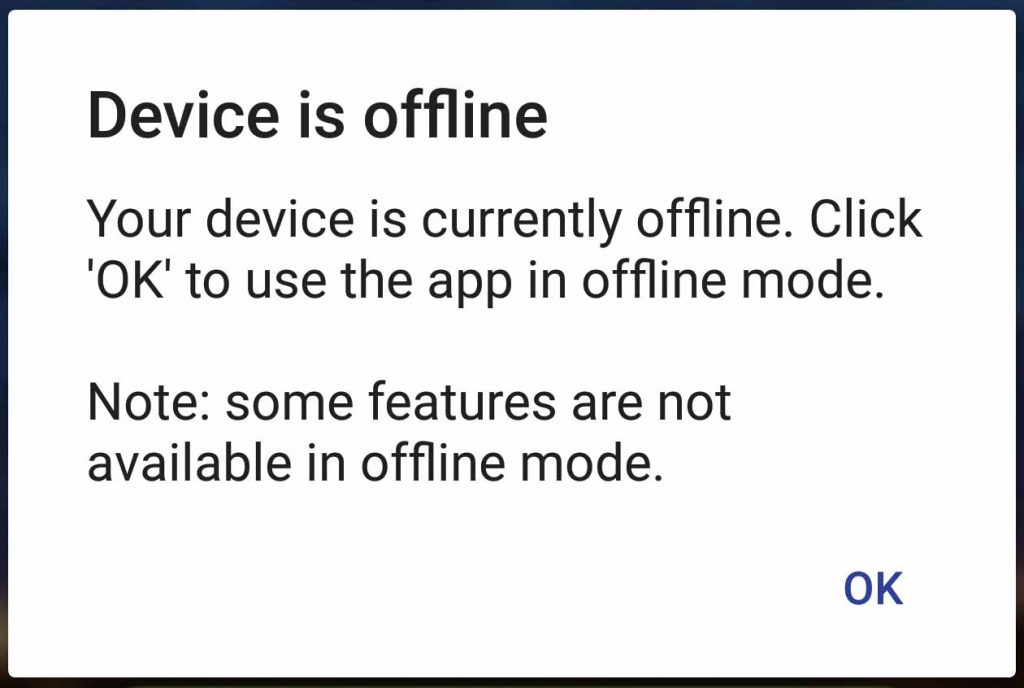
Q. How will I know if I am offline?
A. If your device is offline you will receive the following message.
Q. Do I need to download directory images?
A. You will only need to download the directory images in the event you are travelling to an area that has no internet activity but you still want to be able to view all available images we have for campsites or businesses on the App.
If you do not do this, you will only see generic category images in the listings, but all other information will still be available.
Q. How do I download directory images?
A. To download the Directory Images do the following;-
Go to the Me page > Select Offline Content > Select Directory Images

Here you will see two files that you can download.
All Directory Images
Additional Directory Images
All Directory Images
This file contains all images relating to the directory listings. It is recommended to download this file first. This file will be updated in full at the beginning of each month.
Additional Directory Images
This file contains all images that have been added to the directory since your last full download. It is updated weekly. It is recommended that you download this file to save on data, if you are downloading mid-month, and have already downloaded the All Directory Images file.
Both these files will have the approximate file size beside them. Once downloaded they will be installed automatically and you can then view images when in Off-Line mode.
Q. How much data is used when I download things?
A. Before you download any data from the FRC App you should check your data allowance.
The approximate size of each file may change and is shown beside it prior to downloading.
Mobile data will be used if you are not connected to Wi-Fi. We highly recommend downloading data files when you are connected to a Wi-Fi connection.
Q. How can I suggest a new site or business?
Step 1 – From either the map view or the list view you will see a white ‘+’ button at the top left of the screen.

Step 2 – Press on this button and it will redirect you to a form which you can fill out the details, add photos and submit. Once your form has been submitted, one of our team will contact the site owners, verify the site, complete and publish the listing.
Q. What type of sites can I suggest?
A. You can suggest any type of site that we do not already have in the directory, these can include Free Camps, Campgrounds, Caravan Parks, or Businesses. Basically anywhere where it is legal for you to camp in either a tent, caravan, motorhome or other form of temporary accommodation.
We do not just want illegal sites, for e.g. gravel pits on the side of the road where it is illegal to camp and you may risk the chance of being moved on or fined.
Once a suggestion is made to FRC one of our team will contact the site owners, verify the site, complete and publish the listing.
Q. How can I review a site?
A. Reviewing a site is invaluable feedback for all our member and can assist in helping to select the best site for you. All our reviews are moderated, and any adverse reviews are bought to the attention of site owners so they may comment on them. This avoids frivolous reviews that are not always put on for the right reasons.
There are two ways to submit a review from within a listing
1. By pressing the ‘Rate this place’ wording under the small map
2. By pressing the ‘Review’ icon in the bottom left corner of the screen

Clicking on either of these two places will take you to the review page where you can give a star rating on Location, Facilities, Service & Price. You can then also add a comment.
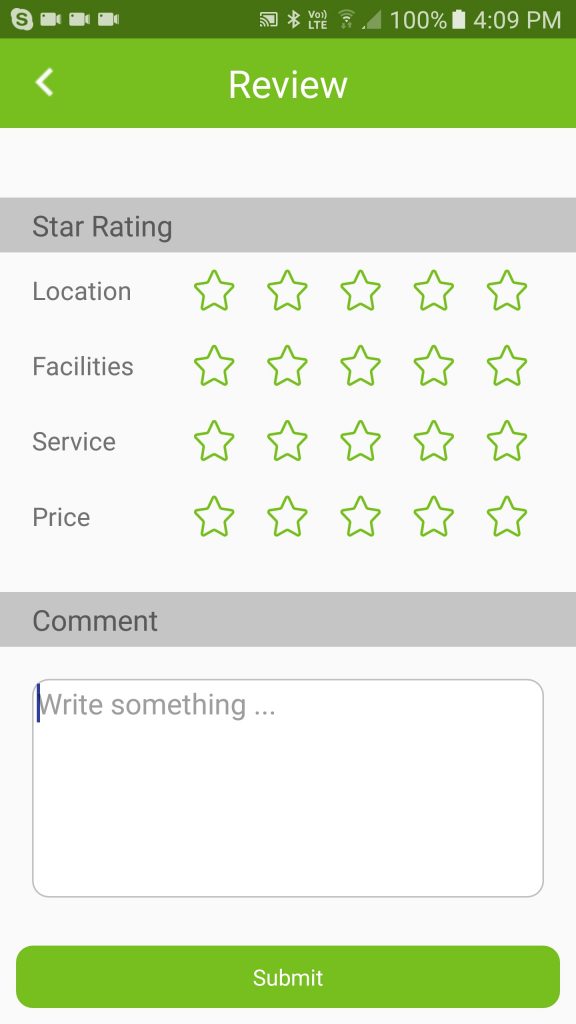
Once complete, press the ‘Submit’ button at the bottom of the screen and your review will be submitted for moderating.
Q. Can I upload photos of a site I like?
A. Yes you can and we highly encourage this. However, at this stage, this is only possible from the website. To do this, please go to the same listing in the website. At the bottom of the listing you will see our Comment section.
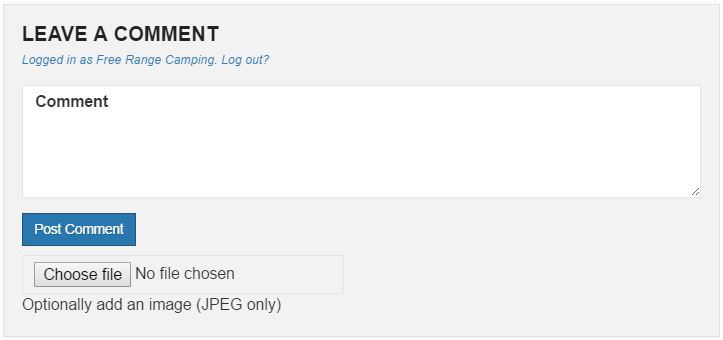
At the bottom of this section you will see the ‘Choose File’ button. By pressing on this you can navigate it to the file location of the image you want to upload and send it in to us.
Q. What is the update site button for?
A. In each listing, you will see a button that states ‘Update Site’. Also the wording ‘Is this site closed, not there, or incorrect? Click here to report it.’

Pressing on this button will open a new window and allow you to report this site to us for further investigation. Once we have confirmed the information we will update the listing.
Q. How often do I have to update the App?
A. If updates are made to the App, we will advise you of this either via email or by notifications from your relevant App store, i.e. Google or Apple.
You can also check for updates yourself by activating notifications or visiting the store on a regular basis to check.
Q. How often are the campsites & business listings updated?
A. We are updating existing listings and adding new listings on a daily basis. As the changes are made they are updated on the App on an hourly basis.
Each time you open your App, it will automatically accept a small 2–3 mb file that will update your App and make any new or updated listings available for you to see.
Q. What do I do if my App crashes?
A. If your App crashes, you will get a message that reads.
If this occurs, try the following;-
Exit the App restart it
Reboot your device
Check and update latest software upgrades if available. This is done from the Setting Screen on your device.
If this still fails, you may need to uninstall and re-install the App.
If your App continues to crash please report it to us, including the device and the version number you are using, by emailing us direct from here.
Report App Crash
- Member Cards & Discounts
-
Q. Why do I need a member card?
A. Your FRC Premium Club Member card is to identify you to our FRC Business Partners when they are providing a Discount or Offer
Q. Do you have plastic member cards?
A. No, at this stage, we have chosen not to use Plastic Membership cards for FRC members. Instead your membership card is a digital card which is built into the App. This allows us to get your card to you without having to mail it out.
It also has many other functions built into it, including the ability to place your own avatar on the card for identification purposes, and the ability to photograph your receipts to keep track of what you spend on the road. You can access your card by pressing the member card icon at the bottom of the screen on the App, or from within listings that offer a Club Discount.
Q. Where can I find my member card?
To access your FRC Membership Card, follow the steps below.
Q. What details are on my member card and why?
A. Your member card contains a variety of details;-
Photo Id – Your photo is used by our FRC Business Partners to visually identify you when you claim your Discount or Offer.
Name – Your name is shown to identify yourself to our FRC Business Partners when you claim your Discount or Offer.
Member Number – Your FRC Premium Club Member number is shown on the card and will be used by some FRC Business Partners to access your member details so they can confirm you are a current member.
Member Since – This shows the date that you joined FRC and ensures that your membership is still valid so that any discounts or offers can be honoured.
Location & Postcode – Your home town and postcode are shown on the member card to identify your home town location. As the Discounts and Offers are designed specifically for travellers, some FRC Business Partners may exclude certain postcodes from accessing the discounts in their local area. If this is the case, it will be included in the terms and conditions within the relevant listing.
Time & Date Stamp – At the bottom of the card you will see an active time and date stamp. This is to show our FRC Business Partners that this is a live and active member card. Static images will not be accepted.
Q. What member benefits are available to me?
As a FRC Premium Club Member there are a host of benefits available to you. These are outlined in further detail in the Premium Club Membership section. The benefits available to you at our FRC Business Partners will vary and can include either Discounts or Special Offers.
Discounts – Each participating Business partner will nominate their own Discounts. They will usually include a percentage discount off total or partial spends. In many cases items already on special will be excluded. Discounts are clearly displayed at the top of each listing and will vary from Business to Business.
Special Offer – Each participating Business partner will nominate their own Special Offer. They may include a two for one special, discount on second purchase, or a gift. Any terms or conditions of the offer are clearly displayed at the top of each listing or in the description and will vary from Business to Business.
Q. What is a FRC Business Partner?
A FRC Business Partner is any business, including Campgrounds or Caravan Parks that has partnered with FRC and provides an incentive or benefit to our Members in the form of either a Discount or Special Offer. Most of our Businesses are associated or affiliated with the RV & Camping industry.
Q. Do I have to put my photo on my member card?
Putting your photo on the member card is a choice that is left up to you, it is not compulsory, but highly recommended as some FRC Business Partners will only honour their Discounts or Offers if they are able to visually identify you. A photo on your card is the simplest way for them to do this.
Q. What does the View Offer Banner mean?
A. In the preview window when in either Map or List view, Campsites or Business listings that offer a discount/offer are clearly marked with an orange View Offer banner.
This is to readily identify those listings as FRC Business Partners so you know they have a member benefit available to you.
Q. What does the Club Offer Banner mean?
In each listing that offers a discount/offer, there will be an orange Club Offer banner across the top of the screen and over the images.
This is to readily identify that there is a discount or offer you are entitled to. The discount/offer will be displayed in the listing just under this the features/facility icons. It will be displayed in bold with any conditions under this.
Q. How do I claim my discount/offer?
To claim your discount/offer, simply have the relevant listing open on your App.
Show the staff member either your member card or the discount/offer from the listing.
They will then honour the discount/offer for you.Remember to use the Photo icon and take a snap shot of your receipt for your records and also, to send a copy into us to go into the monthly draw for great prizes.
- Downloading & Setup
-
Q. How do I download the FRC App?
A. Downloading the App is simple.
From the FRC website www.fullrangecamping.com.au you can follow the links to either the Apple App store or Google Play store.
It is free to download the App in the usual manner, however you will need an active Premium Club Membership to login to use the App.
Or, you can head on over to either the Apple App store or Google Play store direct and search for FRC.Q. How do I install the App?
A. Once you have downloaded the App, it is just a matter of pressing the install button and it will install directly onto your device. You will be asked two questions during the install.
Q1. Allow FRC to access photos, media and files on your device?
Allowing this access will permit FRC to store images and data files on your device, that are needed to display in the listings. It will also permit you to send images to FRC.
Q2. Allow FRC to access this device’s location?
Allowing this access will enable us to automatically show sites in your area and assist with the navigation functions of the App. It will also show listings in your vicinity that offer discounts or special offers to members.
Q. How do I login to the App?
When you open the app for the first time, you will get a series of welcome screens.
You will then see the login screen. Enter the email address and password you registered with. Then press the green Sign in button.
The App will check your credentials. If your password is incorrect, you will receive an error message. If correct you will receive a Welcome message and the map will open at your current location with all available sites in the nearby area.Q. What do I do if I forget my password?
If you cannot remember your password, there is a small ‘Question Mark – ?’ in the password entry field.
Click on this and you will be directed to the reset password screen of the website. Here you can enter your username or email address. You can then either ask for a Send Password Hint or Get New Password.Q. Do I have to log in each time I use the App?
This depends on how you exit the App after you finish using it. If you choose to log out of the App from the Me screen after using it, then Yes, you will have to log back in to the App on your next use. However, if you just exit the App by closing it, or it times out, your App will remember your credentials and log you back in automatically.
NOTE: If you are planning to use the App when offline, it is recommended that you do not log out. If you do log out and then try to log back in whilst you have no Wi-Fi or mobile data connection, you will be unable to access the App as it cannot verify your login details.
Q. How do I log out?
To log out of the App, press the Me icon located at the bottom right corner of your screen to access the Me page. Press “Log out” at the bottom of the page.
NOTE: This will log you out and you will need to log back in again with your valid username and password to access the App again. This is different to just closing the App.
Q. How can I change my password?
From the Me screen, select Change Password.
You will then be asked to enter your new password and confirm it.
You can also change your password from the Member Profile page in the Admin section via the website. - Site Updates & Feedback
-
Q. How often do I have to update the App?
A. If updates are made to the App, we will advise you of this either via email or by notifications from your relevant App store, i.e. Google or Apple.
You can also check for updates yourself by activating notifications or visiting the store on a regular basis to check.Q. How often are the campsites & business listings updated?
A. We are updating existing listings and adding new listings on a daily basis. As the changes are made they are updated on the App on an hourly basis.
Each time you open your App, it will automatically accept a small 2–3 mb file that will update your App and make any new or updated listings available for you to see.Q. What do I do if my App crashes?
A. If your App crashes, you will get a message that reads.
If this occurs, try the following;-
Exit the App restart it
Reboot your device
Check and update latest software upgrades if available. This is done from the Setting Screen on your device.If this still fails, you may need to uninstall and re-install the App.
If your App continues to crash please report it to us, including the device and the version number you are using, by emailing us direct from here.
Report App Crash - Searches & Filters
-
Q. How do I search for sites on the App?
A. There are several ways to search for Campsites or Businesses on the App.
When the App first opens, it will automatically open in the Map view and zoom into your current location.
From here, you can use one finger to move the map around your screen, or two fingers to zoom in and out of the Map.
Once you stop moving, the map will populate with map markers. By default all the sites we have available will appear, including Campsites & Businesses.
To reduce the amount of map markers showing, you will need to use our Filters to select only the sites you wish to see. For more information on Filters click here.
You can also search by the name of a Town or Location.
At the top of the Map screen you will see a magnifying glass with the words ‘Town or Location’.
Start typing in this section and a list of Towns or Locations matching your request will start to appear. When you find the Town or Location you would like to see, press on the map marker and you can zoom into this location on your screen.
NOTE: At this stage, you can only search by Town or Location names, not by specific site names.
Q. What happens when I press on a map marker?
A. When you press on a map marker, a small preview window will appear at the bottom of the screen, displaying the following information.
Image
A small preview image of the site if provided by the site owner, or if unavailable an image showing the category the site belongs to.
Title
The title of the site is shown. If the title is long, it may be truncated. To see the full title you will have to press on it and enter the full listing.
Heart Icon

Pressing this icon allows you to place this site into your Favourites Collection list. If the heart is clear it has not been selected yet, if it is orange, it has been previously selected.Ratings
Under the title of each listing you will find a series of stars used to rate each site. These will vary from 1 star through to 5 stars. The more stars the better the rating.Icons
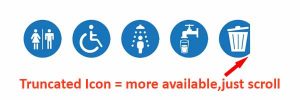
The icon section shows all the features or facilities at a site or location. There are only a limited number of icons available in this view, however, if the last icon is truncated, it will mean that you can scroll across these icons to view them all. For a more detailed explanation of our icons as they refer to each listing, see the bottom section within the listing where you will see the icons again, but this time with a title and additional information if required.
Or for a full list of our icons refer to the Icons section here.Distance
In the bottom right hand corner of the preview window, you will see a distance shown in Km. This is the distance from your current location to the site.Q. How do I use the Filters on the App?
A. The FRC App has filters installed which allow you to search for only the sites that meet your selection criteria.
To use the filters, press on the ‘Filter’ Icon at the top right of the Map or List screen.

From here you will see two categories of Filters. ‘CAMPSITES’ & ‘BUSINESS’
Campsites
Under Campsites you can select only the type of sites that are relevant to you. For a full list of Campsite categories, see ICONS & MAP MARKERS EXPLAINEDOnce you select the category you would like, it will change colour.
You can then further select the Features you would like at that site. Eg, Toilets, Showers, Pets etc.Remember the more you select, the less map icons that will show.
You can also use this section to select specific types of Campgrounds.
E.g., if you wanted to show only Showgrounds, you would scroll down the list, and select the ‘Showgrounds’ icon. This will then only display Showgrounds all around Australia, depending on where you are located on the Map, or in List view they will appear in order of the distance from your current location.Once you have made your selection, press the ‘SEE FILTERED SITES’ button at the bottom of the screen. This will take you back to the Map or List view and show only the sites that are relevant to your selection.
Business
Under Business, you can select the type of business that you are looking for. For a full list of Business categories see here.Once you select the category you would like, it will change colour.
You can then further select the Features you would like at that business. E.g., Discount, Offer or RV Parking.
Once you have made your selection, press the ‘SEE ALL SITES’ button at the bottom of the screen. This will take you back to the Map or List view and show only the sites that are relevant to your selection.
Reset Filters
At the top left of the screen you will see the ‘Reset’ Button. Pressing this will reset all filters and allow the map to be re-populated with all available campsites and business listings.Clear Filters
At the top right of the screen you will see the ‘Clear’ button. This will remove all selected categories or ticks from the Features boxes.Q. How do I save my favourite sites?
A. You can save your favourite sites on the App in what we call a Collection. You can save to a Collection from either the website or the App.
From the App
Firstly you need to name your Collections list. To do this to go to your profile page on the App. Press the ‘Me’ icon at the bottom right of the screen.
There you will see the ‘My Collection’ page.By default, you will see a collection called ‘Default List’. It will be empty until you add one of your favourite listings to it. You can either use this list, or create a new Collection list using your own title.
To do this-
Press on the Create New Collection icon.
Enter the title of what you would like to call it.
e.g. My Favourite Campsites & press Save or Done (Dependant upon your device).You can now start saving your favourite Campsites or Businesses from either the Map or List views.
To save from the Map view, press the heart at the bottom right of the screen.
To save from the List view, you can touch the heart to the right of the preview box.
To save from within a listing, touch the Heart at the top right of the screen.Once you touch the heart, it will turn orange, this will add the listing to your collections. The next time you go to the collections you will see a list of all your favourite saved campsites.
- Site Listings Explained
-
Q. What information can I find in each listing?
Images
If a listing has photos available these will be clearly displayed across the top of each listing. A site may contain up to 10 photographs. The images will auto scroll with 5 second intervals. You can speed up the process by moving through them yourself, or placing your finger on an image to pause it.
If photographs are not available it will mean we are in the process of still obtaining them from site owners or members. In this case a generic category icon will be shown.Club Offer
Where a campsite or business is providing a member benefit, either discount or offer, it will be clearly displayed across the images at the top of the listing with a Club Offer Banner.
The actual offer being made will then be displayed under the features/facility icons. It will be displayed in Bold with any conditions under this.
Listing Title
Each listing will show the title of the site and in brackets the category it belongs to. See below for category abbreviations.
(RA) = Rest Areas
(FC) = Free Camps
(CG) = Camp Grounds
(CP) = Caravan Parks
(HS) = House Sitting
(HO) = Help OutRatings
Under the title of each listing you will find a series of stars used to rate each site. These will vary from 1 star through to 5 stars. The more stars the better the rating.
Distance
Also under the title of each listing you will see a distance shown in Km. This is the distance from your current location to the site.Navigation Arrow
To the right of the title and at the bottom right corner of the screen, you will see a navigation icon.

By pressing on this icon you will be given the option to navigate to the site using eitherGoogle Maps – if online
Apple Maps (iOS only) – if online
Google Maps & Here Maps if offlineFor more information see our help section on NAVIGATION
Icons
This section shows all the features or facilities at a site or location. For a more detailed explanation of our icons as they refer to each listing, see the bottom section of the listing where you will see the icons again, but this time with a title and additional information if required.
Or for a full list of our Icons refer to the Icons section here.Description
Each listing will open with a description of the campsite or business giving you an overview of what you can expect at the site.How To Get There
The majority of listings will have written instructions on how to get to a site, usually from major locations. This will include where possible, any recognisable landmarks, designed to make it easy when approaching a site, especially with a large caravan or motorhome. They may also include short cuts and GPS warnings if appropriate.Site Access
The majority of listings will have information provided about the site access. This will include what to look out for visually as you approach the entrance to the site and if provide further instructions on what do to once at the site. E.g. Check-in instructionsVideo Preview
Where available, a listing may contain a short video presentation of the site, showing the main features of the site. This is still only available for a limited number of sites but our list is growing daily.
Listings that have a video will have a video play button clearly visible.
Fees & Bookings
In each listing where relevant, we aim to give an indication of fees if applicable to that site. We rely on the site owners to provide this information and it is indicative only. It should not be relied upon to be 100% accurate. We have supplied contact details of each site if available and would encourage you to check direct with site owner in regards to the latest fees.Things to Do
Where possible, campsite listings will contain a section highlighting either things to do at the actual site, or in the nearby area. This allows you to pre-plan your trip by giving an indication of how long you may need to stay at a certain location.Address & Contact Details
Each listing will have the full address of the site, allowing to you enter it into your GPS device if required, or ring the site owners direct.Website Links
Where provided and if available each listing will have a direct link to the owner’s website or Facebook page where you can access further information about them.Pricing
Where applicable, this will show the lowest base price available for a listing in its simplest form. E.g. From $5
Prices shown are based on a per couple per night basis. We rely on the site owners to provide this information and it is indicative only. It should not be relied upon to be 100% accurate.Features
This is a list of all the features and facilities provided at the site location. They will be identical to the icons shown in both the preview window and also at the top of the site listing. However, in this section there will be a title showing what each icon means, and also where relevant, additional comments.
E.g. Time Limit Applies – 72 HoursUpdate Site
This button allows you to provide information to us so we can update sites and verify site information.
For further information about this function see Update SiteMap
In each listing you will see a small map. This map is not for navigation purposes but only to give a visual of the site location and nearby streets. By pinching with two fingers on the map you will be able to zoom in and out.Rate this place
This section allows members to leave a review of each site. For full explanation please see How can I review a site?
Q. What is the camera icon in a listing used for?
At the bottom of each business listing you will find a Camera Icon.
This icon is used for you to photograph your receipts should you shop at a FRC Business Partner
By photographing your receipt it will do two things.
1. It will keep the image in your image library for your records. This will help in keeping track of costs for your trip as well as keeping a copy on hand should you need to return any purchases, or for warranty purposes.
2. It will automatically send a copy of the receipt to us with your member number attached. This will allow us to collate the data and prove to relevant authorities, councils etc., that campers, caravanners and travellers do spend money in locations as they travel. This will go a long way to providing future Free and Low Cost Camping options to all of us.
Once you have taken a snap shot of your receipt, make sure it is clear and be sure to press the OK button at the top left of your screen. This will save it to your device and send a copy to FRC.
Sending in your receipts will automatically enter you in our monthly draw to win some fantastic prizes.
It is not compulsory to send in your receipts, and all information sent in will be kept strictly confidential. For more information on this please refer to our Privacy Policies.
Q. What is the member card icon in a listing for?
At the bottom of your listing you may see a Member Card icon.
- Icons & Map Markers Explained
-
Camp Site Icons & Map Markers
Business Icons & Map Markers
Site Features/Facility Icons
Other Screen IconsCamp Site Icons & Map Markers
Business Icons & Map Markers
Site Features/Facilities
Other Screen Icons
- Navigation
-
Q. How do I navigate to a site? – Online Navigation
A. Our inbuilt navigation tool alleviates the need to input co-ordinates into a separate GPS device.
To the right of the title and at the bottom right corner of the screen in each listing, you will see a navigation icon.

By pressing on this icon you will be given the option to navigate to the site using either Google Maps or Apple Maps (only if using an iOS device)
NOTE: You can only use the Apple Maps if you will have full connectivity for the whole of your journey. If this is not the case, it would be advisable to use Google Maps and refer to our Offline navigation section.
Once you have chosen your preferred mapping option, you will get the following notifications;-
Android Devices
Select OPEN IN GOOGLE MAPS
You will then be directed to Google maps where you will be shown the following details;-
– Your starting location
– Your destination
– Approximate time to location depending on mode of transport
– A map showing the fastest and alternate routes if any
– Approximate time and distance to locationThere are other route options available by pressing the ROUTE INFO button. When you are happy with the chosen route, simply press the START button at the bottom of the screen and Google Maps will direct you to your chosen site.
To return back to the listing from Google Maps, simply press the back button on your device.
iOS Devices
You will have the choice. If you Choose Google Maps, refer to instructions above.
If you choose Apple Maps you will see the following:-
Select Open in Apple Maps
You will then be directed to Apple Maps where you will be shown the following details;-
-Your Current Location
-Your Destination
-Approximate time to location depending on mode of transport
-A map showing the route
-Approximate time and distance to locationIf you are happy with the chosen route, simply press the GO button at the bottom of the screen and Apple Maps will direct you to your chosen site.
To return back to the listing from Apple Maps, simply press the back button on your device.
Q. How do I navigate to a site? – Offline Navigation
If you wish to take advantage of our Offline navigation functions, you will firstly have to download Offline maps from Google Maps. This function will allow you to use the app to navigate to a campsite or business for times when you have no Wi-Fi or phone connection.
To download Offline Maps take the following steps:-
– Open Google Maps on your device
– Select the drop down (hamburger) menu in the top left of screen.
– Select Offline maps– Press on SELECT YOUR OWN MAP
– Use the selection window to select the area that you wish to download maps for. You can use two fingers to zoom in and out on the area that you require.
Select DOWNLOADNOTE:
You will have to prepare for this before you go offline and still have Wi-Fi connectivity.
Offline maps will require data downloads and adequate storage space on your device.
The bigger the area, the more data you will require.
Offline maps will not work with Apple Maps.
You will need to download offline maps for all the areas you anticipate travelling to. If you select a site out of this area, offline navigation will not work.
By default, Google Offline Maps will only remain valid for 1 month from the date of downloading. After this they will automatically update to keep up-to-date.Once you have installed all required offline maps to your device, you can navigate to your selected campsite or business using the same procedures as Online Navigation.
Q. How can I zoom back into my current location?
Towards the bottom right hand corner of the mapping screen, you will see a small blue button that looks like a small compass.
Pressing this icon, no matter where you are located on the map, will return you to your current location. Provided the location services have been activated on your phone.
Q. How are distances to a site calculated?
The distances shown on both Google Maps and Apple Maps are road distances by kilometres. The suggested route is shown in with a blue line.
- Offline Content
-
Q. Can I use the App offline?
A. Yes. The FRC App is designed to be used offline for times where you have no Wi-Fi or phone connection. To do this you will have to prepare it by following the instructions in How do I download offline maps?
Q. Do I need to download offline maps?
A. You will only need to download offline maps in the event you are travelling to an area that has no internet activity, but you still want to be able to view and find campsites or businesses on the App. Downloading our offline maps will allow for our map markers and all sites to show on your screen without a connection. By pre-loading offline maps, you will be able to view all listings at all times.
This is different to our offline navigation feature. For more information on this refer to How do I navigate to a site – Offline Navigation
Bear in mind that any changes or updates made to any listings while you are in offline mode will not be actioned until you are back in a mobile coverage area or have a Wi-Fi connection.
Q. How do I download offline maps?
A. To download offline maps, you will need to do the following;-
Go to the Me page > Select Offline Content > Select Offline Maps
Offline maps will allow you to download maps state by state. You can select only the state that you require if you wish to save on data. The approximate size of each data file will be shown below each state. You can only download one state at a time. You will only need to do this only once.
Once you have done this you will be able to view all content when you have no connection.
For more information on the amount of data required, see How much data is used when I download things.
Q. How will I know if I am offline?
A. If your device is offline you will receive the following message.
Q. Do I need to download directory images?
A. You will only need to download the directory images in the event you are travelling to an area that has no internet activity but you still want to be able to view all available images we have for campsites or businesses on the App.
If you do not do this, you will only see generic category images in the listings, but all other information will still be available.
Q. How do I download directory images?
A. To download the Directory Images do the following;-
Go to the Me page > Select Offline Content > Select Directory Images
Here you will see two files that you can download.
All Directory Images
Additional Directory ImagesAll Directory Images
This file contains all images relating to the directory listings. It is recommended to download this file first. This file will be updated in full at the beginning of each month.Additional Directory Images
This file contains all images that have been added to the directory since your last full download. It is updated weekly. It is recommended that you download this file to save on data, if you are downloading mid-month, and have already downloaded the All Directory Images file.Both these files will have the approximate file size beside them. Once downloaded they will be installed automatically and you can then view images when in Off-Line mode.
Q. How much data is used when I download things?
A. Before you download any data from the FRC App you should check your data allowance.
The approximate size of each file may change and is shown beside it prior to downloading.
Mobile data will be used if you are not connected to Wi-Fi. We highly recommend downloading data files when you are connected to a Wi-Fi connection. - Site Updates & Feedback
-
Q. How can I suggest a new site or business?
Step 1 – From either the map view or the list view you will see a white ‘+’ button at the top left of the screen.
Step 2 – Press on this button and it will redirect you to a form which you can fill out the details, add photos and submit. Once your form has been submitted, one of our team will contact the site owners, verify the site, complete and publish the listing.
Q. What type of sites can I suggest?
A. You can suggest any type of site that we do not already have in the directory, these can include Free Camps, Campgrounds, Caravan Parks, or Businesses. Basically anywhere where it is legal for you to camp in either a tent, caravan, motorhome or other form of temporary accommodation.
We do not just want illegal sites, for e.g. gravel pits on the side of the road where it is illegal to camp and you may risk the chance of being moved on or fined.
Once a suggestion is made to FRC one of our team will contact the site owners, verify the site, complete and publish the listing.
Q. How can I review a site?
A. Reviewing a site is invaluable feedback for all our member and can assist in helping to select the best site for you. All our reviews are moderated, and any adverse reviews are bought to the attention of site owners so they may comment on them. This avoids frivolous reviews that are not always put on for the right reasons.
There are two ways to submit a review from within a listing
1. By pressing the ‘Rate this place’ wording under the small map
2. By pressing the ‘Review’ icon in the bottom left corner of the screen
Clicking on either of these two places will take you to the review page where you can give a star rating on Location, Facilities, Service & Price. You can then also add a comment.
Once complete, press the ‘Submit’ button at the bottom of the screen and your review will be submitted for moderating.
Q. Can I upload photos of a site I like?
A. Yes you can and we highly encourage this. However, at this stage, this is only possible from the website. To do this, please go to the same listing in the website. At the bottom of the listing you will see our Comment section.
At the bottom of this section you will see the ‘Choose File’ button. By pressing on this you can navigate it to the file location of the image you want to upload and send it in to us.
Q. What is the update site button for?
A. In each listing, you will see a button that states ‘Update Site’. Also the wording ‘Is this site closed, not there, or incorrect? Click here to report it.’
Pressing on this button will open a new window and allow you to report this site to us for further investigation. Once we have confirmed the information we will update the listing.
- Updates & Crashes
-
Q. How often do I have to update the App?
A. If updates are made to the App, we will advise you of this either via email or by notifications from your relevant App store, i.e. Google or Apple.
You can also check for updates yourself by activating notifications or visiting the store on a regular basis to check.Q. How often are the campsites & business listings updated?
A. We are updating existing listings and adding new listings on a daily basis. As the changes are made they are updated on the App on an hourly basis.
Each time you open your App, it will automatically accept a small 2–3 mb file that will update your App and make any new or updated listings available for you to see.Q. What do I do if my App crashes?
A. If your App crashes, you will get a message that reads.
If this occurs, try the following;-
Exit the App restart it
Reboot your device
Check and update latest software upgrades if available. This is done from the Setting Screen on your device.If this still fails, you may need to uninstall and re-install the App.
If your App continues to crash please report it to us, including the device and the version number you are using, by emailing us direct from here.
Report App Crash